Guitar Building
I am currently learning to build and maintain acoustic guitars under the watchful eye of master luthier Julius Borges. Here is a photo of my first project.
I had a “Gibson Blueridge C” acoustic guitar that had a top with many deep and serious cracks that the previous owner had filled with large gobs of glue. In the photo to the right you can see four cracks beneath the bridge following the grain of the wood. To the left and right of the sound hole are more large cracks running the full length of the guitar. The top had also gotten wet and stayed under full string tension for years. This resulted in the wood around the bridge pulling up and forward. Eventually most of the cracks had opened so far I could not keep the guitar at full tension for fear of the bridge pulling the strips of wood under it right off. The guitar sat in a case under little or no tension for a couple years while I tried to figure out what to do with it.
After meeting Julius Borges and being invited to observe and learn luthier skills at his shop I decided that re-topping this guitar would make a great introduction to the guitar building world.
Removing the top involved first removing the neck. A fret over the neck dovetail joint was removed and a very small hole was drilled. A needle (similar to those used to pump up a basketball) attached to a hose from a pressure cooker was inserted and steam was injected into the joint to soften the old glue. Once the glue was softened a jig that puts downward pressure on the guitar body and upward pressure on the neck heel was used to pry the neck up and off the guitar. The neck was set aside for its own rehab yet to come.
Separating the old, cracked top from the sides was done by heating the edge glue joint with an iron and carefully prying with a small spatula-type tool. The bridge was heated and removed with more care and set aside. Because we were not trying to save the top we did not have to be gentle with the wood. Saving the sides, however, was important. Once the top was removed several days of sanding and cleanup followed. It was painfully obvious that Gibson wasted no time in getting these guitars out the door. The inside of the guitar was a mess. Braces needed to be re-glued and every surface sanded down and cleaned up. Some pieces of cracked or damaged kerf lining (a notched strip of wood that runs around the edges of the sides and creates a gluing surface for the top and back) had to be removed and replaced. The finish on the back and sides was then stripped off and the wood was scraped, leveled, and sanded, and sanded, and sanded.
A new piece of Engleman spruce was chosen for the new top. The top is made from two thin pieces of wood cut from a thicker board. The pieces form a “bookmatched” pair. When you look at an acoustic guitar imagine folding the top together like a book with the centerline being the binding. If the two halves could touch together face to face, this is the original orientation of the piece of wood.
The two pieces are glued together and sent through a thickness sander. The top is cut roughly to shape (oversized) and the sound hole is cut and notches are cut into the face for the rosette (the decorative rings around the sound hole).
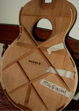
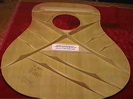
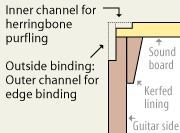
Spruce braces are then cut, shaped and positioned on what will be the inside of the top. Originally the Gibson was braced using a “double X” pattern. This was a bit over braced for my liking so Julius suggested we use a Martin Guitar style of bracing which would lead to a more responsive and tonally active top. The first photo below is an example of the double X bracing, the photo in the middle is a Martin style bracing. To the right is a picture showing a cross-section of the gluing surfaces and routed channels where the top gets glued to the sides.
Once the braces have been glued the centerline of the new top is lined up with the centerline on the existing sides. Glue is applied to the kerf lining and the top is positioned and clamped down and left for the glue to dry. When the clamping is removed the top is trimmed to size and a notch is routed around the edges to set in the binding (a strip of wood or synthetic material that lines the corner joint of the sides and top).
The binding can be made out of wood or other materials and is cut into strips that are sized to the routed channels (or the channels may be routed to the size of the binding). The binding is glued in place as it gets worked into position around the guitar. It is held in place by strips of tape while the glue dries. It is important to keep the binding tightly pressed into the routed channel while drying so some will use an elastic cord wrapped all around the guitar.